

Rotoscoping: the process of manually altering, frame by frame, the look of a video. Even though the technique is used for special effects (namely for the creation of masks), rotoscoping also applies to animation. Basically, it’s drawing on top of a video. Confusing?
Initially, the rotoscope was invented to make animations more fluid and real. This invention allowed movies to be projected on glass, where animators places paper and drew. So they drew on top of movies that were projected, following lines of movement. This allowed the animation of characters to become much more realistic and not so sloppy. You can learn more about the history of rotoscoping here.
On top of helping in the actual process of animating, these days people are using this technique to give their works a more analogic look. Instead of digital animations, we see colorful drawings done with coloring pencils, grease pencils, watercolors, pens, charcoal, etc. The animations gain texture, therefore, they gain more visual appeal.
Despite that, this technique is also used a lot on digital animations, seeing as it’s easy to speed up the rotoscoping process with the help of Adobe Photoshop.
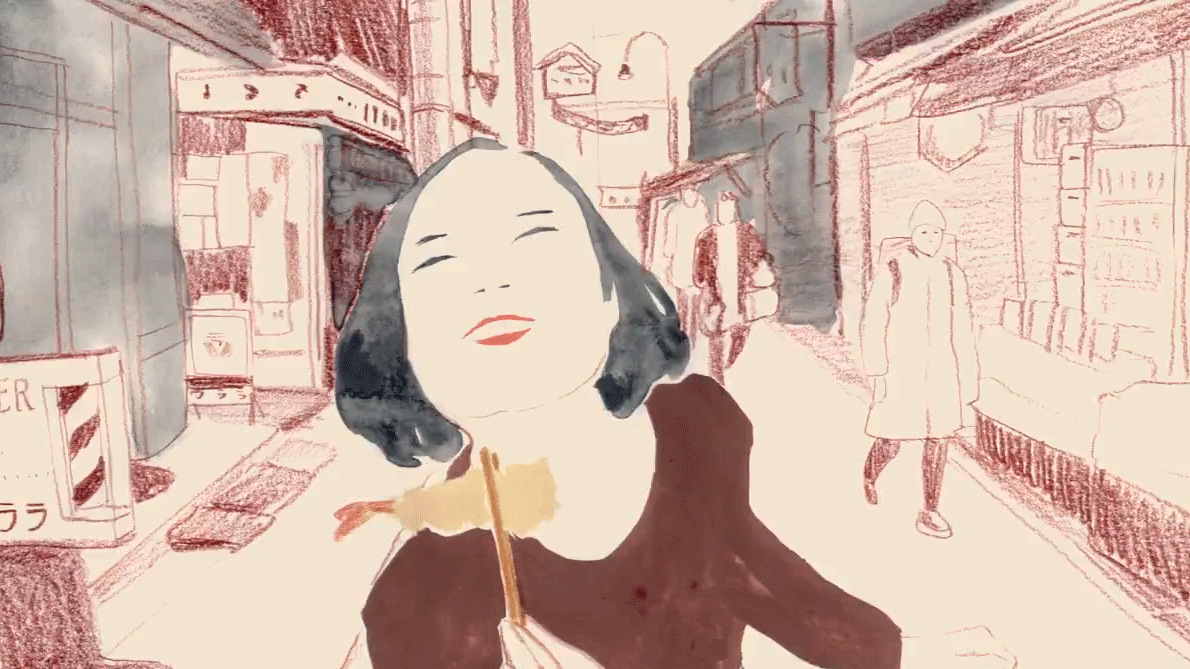
It was after watching this video from ShiShi Yamazaki that I decided to understand how to do this. Even though the author doesn’t mention using the rotoscoping technique I have my suspicions! On her channel we can find other hypnotizing animations of the same style.
Of course the drawings don’t have to be 100% faithful to the base video. Creativity doesn’t have limits, and adding elements which didn’t exist in the original video can be a bonus. In addition to that, rotoscoping has everything that prevents the technique from becoming boring. The possibilities are endless, from drawing styles to coloring ways. Even if we choose to do it digitally. The following video is proof of that.
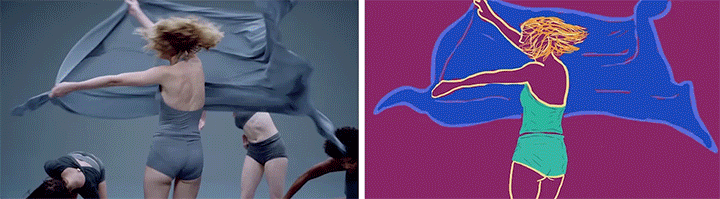
Excerp from “Redrawing Taylor Swift – Shake it Off Rotoscoped”, next to the original music video
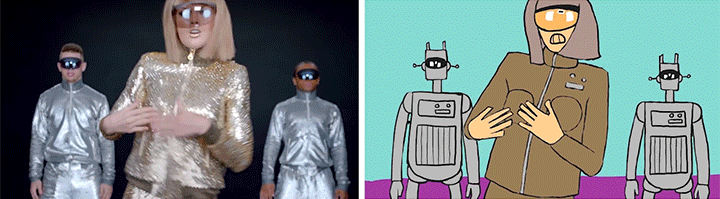
Students from the Animation 1: Design from Animation class at the University of Newcastle, Australia, recreated the “Shake it Off” music video from Taylor Swift. There were 49 students involved in this project, and as we can see, there’s much diversity of styles. Taylor Swift even gains a new life and turns into a cat, a sheep, even Marilyn Monroe.

Or mythological creatures…

The choreographies are taken too literally and even the dancers gain new lives!
The diversity of styles is huge (as it’s expected from a project that involves 49 people). We’ll find simpler drawings…

… up to PRO levels!

… and of completely different styles.

With a lot of work and creativity brilliant result was achieved! Now that we’re all even more excited to try this technique, a warning: there are some out there who say it’s cheating. According to purists, we’re avoiding the traditional process of animation, since we’re not animating characters from scratch. But… Who cares? Even Disney does it! We have all seen videos like this one that show the reuse of movements in different characters and movies. Another way the rotoscoping technique can be used.
Let’s do some rotoscoping?

BUT, BAD NEWS FIRST…
1 second equates to 24 frames. 1 minute is 60 seconds. 60 x 24 = 1440. Yes, 1440 frames. You need 1440 drawings to achieve a fluid animation of one minute.
The good news is that the video above has only 12 frames per second, which reduces the number of needed drawings by half. And no lack of fluidity is noticeable. Are you still excited?
1 – Find a video
And to try it out, I suggest you start with a less ambitious animation. 10 seconds might seem too little, but it’s 120 drawings. Believe me, it’s going to be difficult!
2 – Photoshop is our best friend
Photoshop will help us export the video in individual files. For those who have never done it, it’s simple:
File > Import > Video Frames to Layers
We select the video we want and open it in a new window:

It’s easier if the portion of the video we want to animate is already cut. If it isn’t, we can always choose the excerpt we want with the arrows. The important thing is to click on Limit to Every 2 Frames. This will give us the right images to make the animation 12 frames per second.
Photoshop will open each video frame in a different layer. In case we want to make a digital animation we can start painting top of each layer. If we want to make the animation on paper we have to export each layer to an individual file.
File > Scripts > Export Layers to Files
A new window will open, where we pick the destination folder for the files. I recommend creating a new file! We give it a name and click on Run.
3 – Time to start working
Now that we have all the frames in individual files we can start “rotoscoping”. One of the options (the most convenient one) is to print all the images and then start drawing with the paper on top. Better yet would be with the help of a light table. The other option, more archaic and low cost, is to use the computer screen as a light table and draw on top of it, without having to print anything. With this and a great dose of patience we’ll get there!
4 – Scan and assemble everything
The easiest part: scanning all drawings and assembling them all in a single video file. With an animation that has 12 frames per second, we have to alter the normal settings of a project to 12 fps. Import all the images, and give it the duration of 1 frame. We have to be careful so that, while scanning, all drawings are correctly positioned, otherwise the images will change positions when put together.
If we’re not careful during the scanning, we can also correct the image’s coordinates on our video editing program. On Adobe Premiere, on the window Effect Controls, all you have to do is change thePosition values (and Scale if necessary) and adjust the images. Yes, it’s a laborious job, so the ideal is to scan everything correctly.

With great patience and commitment the magic happens! And then we have videos like this one:

Sorry, the comment form is closed at this time.